Looking to root your brand new Nexus 6P running Android 6.0 Marshmallow? We will take you through the entire process step-by-step in this guide detailed below.
The guide has been split into two sections, one for Windows, and one for Mac OS X.

How to root Nexus 6P on Windows PC:
Requirements:
- Nexus Root Toolkit v2.1.0. You can download it from here.
- A USB-C to USB-A cable to plug your Nexus 6P to the PC.
- Full backup of Nexus 6P.
Instructions:
Step 1: To begin, connect your phone to the PC and launch the Nexus Root Tooklit.
Step 2: NRT will now ask you to select your device. Go ahead and select Nexus 6P from the list, followed by the build of the Android version on your phone. If you’re unsure, click the Auto Detect Device + Build… button to automatically fill in that information, and then hit the Apply button.

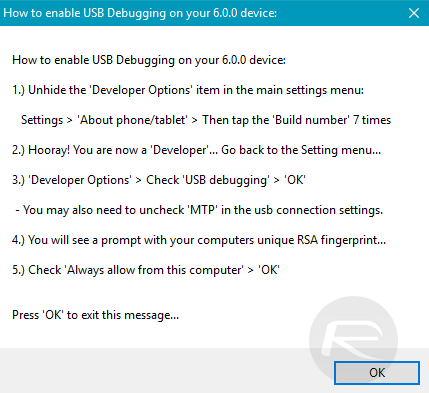
Step 3: Next up, you need to enable USB Debugging, and disable MTP on your phone. To do this, simply follow the on-screen instructions, as shown in the screenshot below.

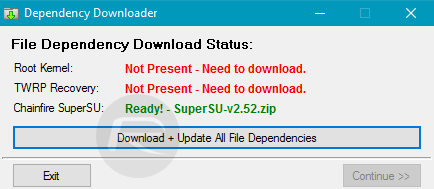
Step 4: NRT will now show you available and missing dependencies. Click Download + Update All File Dependencies button to download the required files.

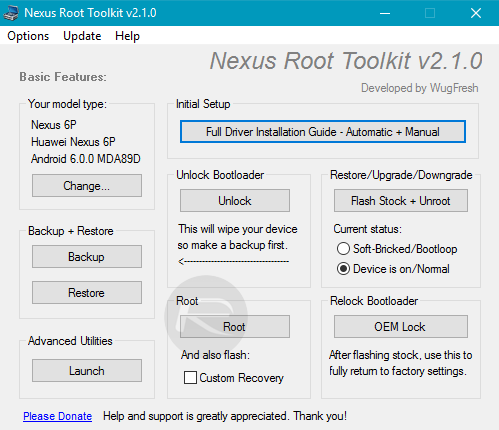
Step 5: Once the files have been downloaded, the Toolkit will automatically launch. You need to unlock the bootlaoder, so do that by clicking the Unlock button under “Unlock Bootloader”, and follow the on-screen instructions. (This will erase all user data on the phone.)

Step 6: Now click the Root button. Make sure Custom Recovery option is checked as well so that the tool also flashes a custom recovery to your phone after rooting it. Simply follow the on-screen instructions and NRT will do the rest automatically.
How to root Nexus 6P on Mac OS X:
Requirements:
- Download the fastboot files for Mac OS X from here.
- Download the Android SDK for Mac from here, and install it.
- Download the latest SuperSU from here.
- Make sure Android version is updated to the latest MDB08K build.
- A USB-C to USB-A cable to plug your Nexus 6P to a Mac.
- Completely back up your Nexus 6P.
Instructions:
Step 1: To begin, you need to set up the Android SDK on your Mac. Install the following packages:
Tools> Android SDK Tools, Android SDK Platform-tools
Extras> Android Support Library, Google USB Driver
Step 2: Now plug in your phone to the Mac and make sure to enable USB Debugging as outlined inStep 3 of the Windows section above.
Step 3: Once done, you need to unlock the bootloader. Be warned that this will erase all of your data. To do so, launch the Terminal and enter the following command:
fastboot-mac flashing unlock
Step 4: When you see a screen on your phone asking you to confirm this action, simply use the Volume buttons to navigate to highlight your desired option, and using the Power button to select it.
Step 5: Now enter the following command in Terminal:
fastboot-mac reboot
Step 6: Now you need to download the angler-mdb08k-boot.zip package which is basically the modified boot.img file for Nexus 6P. You can get it from here.
Step 7: Extract the package and copy the file over to the Android SDK installation location.
Step 8: Now copy the SuperSU package you downloaded from the Requirements section above to the root of your phone’s internal storage.
Step 9: In Terminal on OS X, navigate to the location where fastboot is and where you copied the modified boot.img file, and then enter the following command:
fastboot-mac flash boot boot.img
Step 10: Once the image is flashed, using the Volume and Power buttons on the phone, select the Reboot Bootloader option to boot into TWRP recovery.
Step 11: Once in recovery mode, simply flash the SuperSU package you had copied to the phone earlier. Once the package is installed, simply reboot the phone and voila! You will now boot into a rooted environment.
To check whether you phone is actually rooted or not, you can head over to Google Play and download any free root checking app to ascertain if your phone has truly been rooted.


Would love to here from you...