Tired of your iPhone or iPad running out of storage space? If you’re an avid music listener and use your iPhone or iPad as such with an extensive list of songs packed into your device, head on after the jump to check out how you can easily shrink the footprint of your audio files on your iOS device’s internal storage.
You may already know that higher the bit rate of an audio file, the larger the file size will be. Typically iTunes purchases max out at 256 kbps, with CD rips topping out at 320. On average, a user is likely to find all kinds of bit rates in their library and chances are that the average Joe wouldn’t even notice the quality difference, until or unless you have a God gifted ability to differentiate between the slightest change.

With only premium earphones being able to discern 320 kbps from 192 or 128 bit rates, those not so fussy about the finesse of audio quality can do themselves a favor by reducing the audio quality marginally. Luckily, even Apple recognizes this, and you will find that this can be easily done from the comfort of iTunes.
Here’s how you can easily reduce the file size of your audio files.
Step 1: Connect your iPhone, iPad or iPod touch to your Mac or PC.
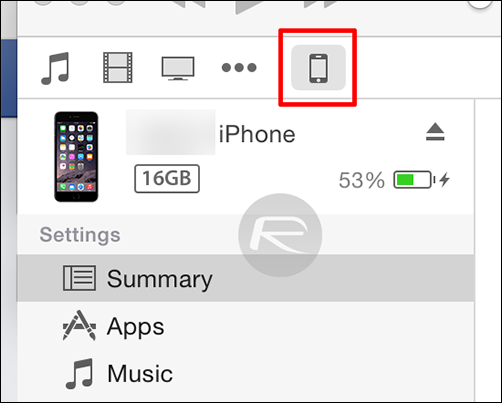
Step 2: Run iTunes and click the ‘iPhone’ or ‘iPad’ icon on the ribbon at the top.

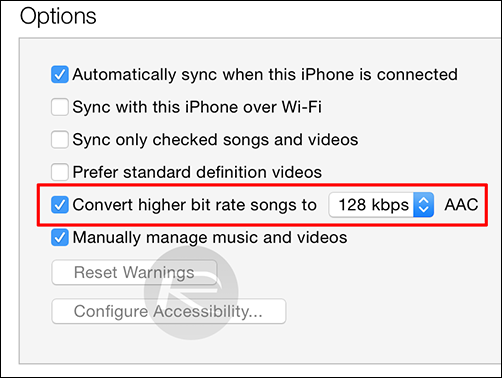
Step 3: You should now see a bunch of settings / options appear in iTunes. Under the ‘Options’pane you would see a setting titled "Convert higher bit rate songs to". This setting here will convert all your higher bit rate songs, such as 320 kbps ones or lower to 128, 192, or 256 kbps ones. That’s not all, the format will be changed to AAC as well, further compressing the audio files while maintaining quality. Go ahead and choose your desired setting.

Step 4: Now hit the ‘Apply’ button in the lower right corner of iTunes, which will begin syncing your songs to your iOS device.
It’s that simple, and with this you’ll be saving a lot of space on your device and cram in more songs, depending on how you look at the whole situation.
Was this tip helpful? Let us know in the comments section below.


Would love to here from you...